 RandKL's
GI Joe Modeling Page
Steel Shields
Ok, the first thing to do is gather the supplies...
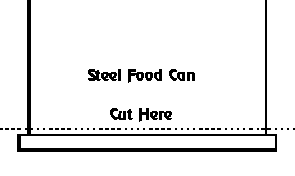
You'll need a few STEEL food cans of course, a medium-sized ballpeen hammer, an anvil of some sorts, and a propane torch for this first part. You can heat the steel on your kitchen stove if you don't want to use the torch.
For a small buckler or targe-type shield, a single serving can of V8 or other similar fruitjuice is what you need. Those are approximately 2.5 inches in diameter which would be approximately 14-16 inches in diameter in full scale.
Large buckler/targe shields, use Campbell's soup cans or similar....viking-type round shields, use a five or six inch diameter juice can or something similar in size.
The key to this is that you select STEEL food cans with smoothly welded seams down the sides, NOT rolled/crimped seams down the sides.
Now use your can opener to cut the bottom off the can from the side....as in this pic. If you have a military issue P-38 type can opener, it will work perfectly! Just cut it from the side and not from the end as you normally open a can.
Don't worry about the sharp edge too much....just rely on your can opener to cut it close enough. It'll be pretty much invisible once you're done anyway.
Now we heat that sucker to red-hot!
The point being here to burn all of the varnish and coating off the steel and to burn the adhesive out of the crimped edge. Word of warning....it can stink to high heaven! Use proper ventilation!
Once the steel disk has been heated to red-hot, let it cool slowly so it'll be soft enough to work with. Annealed. Don't quench it in water or anything.
Next comes the fun part....beating the heck out of it!
Hold your disk at a 45 degree angle on your anvil and start gently hammering the angle where the rim meets the disk on the underside. Work your way around the entire disk until you have the rim shaped outwards at a 45 degree angle like this....
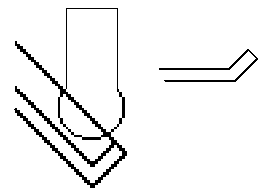
Now turn it over and finish turning the edge inside out until it's bent at a 45 degree angle to the backside instead of the front as it was in the last step....you'll end up with a semi-flat disk with a rim around it that's bent back a bit. The sharp edge from where you originally cut the disk off the can is now on the backside of the shield and with the rim bent backwards, it's almost entirely invisible.
Now lay the disk face down on your anvil....the backside is the one with the edge....and starting in the center, begin gently hammering it with the rounded end of the ballpeen hammer. This is called "dishing" because you're making it concave like a dish. Hammer in a spiral pattern until you reach the rim and then go back and redo it again over and over until you get the curvature you want.
One tip....it's a good idea to heat the disk red-hot between every few spirals of the hammer....it keeps the metal soft and allows the dishing to go a lot smoother. When it cools from red-hot each time it'll be a dull grey and you can then see exactly where your hammer strikes are hitting.
Btw, dishing *can* be achieved by using a tree stump or similar soft object as your anvil and pounding dents into the steel....but in real life that also weakens the metal by stretching it into a concave shape. Hammering on a hard anvil instead, flattens tiny areas of the steel and makes them fractions of an inch larger to form the concavity and doesn't weaken it.
Anyone who tells you to dish your steel on a wooden anvil....well, I won't comment on his experience, but trust in the fact that he probably has a lot of ripped steel laying around.
Once you've gotten it dished to the curvature you want, go back and start spiraling again but with softer and softer strikes to work out the dents you left previously. When you get done....and it will take practice....you'll end up with a perfectly concaved shield that pretty much requires no polishing because there are no dents or marks to be seen.
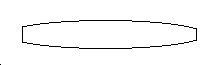
Here's what you wanted to end up with....
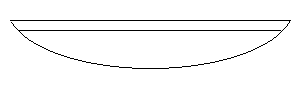
Notice how the inside-out can edge makes a perfect rim around the shield?
For a viking steel-faced shield, you will now mark off six evenly spaced points around the shield a little in from the edge and drill them with a SMALL drillbit for your craftpin rivets. The craftpin rivets will be what holds your steel face onto the wooden shield you're soon to make.
Viking shields almost always used patterns or groups of four nails on the center boss....and almost always six single or groups of nails on the shield face. We aren't using a boss on this type of shield so don't worry about that. Bosses were only used on the flat wooden ones.
Now the tough part....the wood work. This is all trial and error so just take your time until it comes out right....and trust me, it gets easier the more of them you do.
If you're doing a medieval shield, you won't need to worry about the wood....you would just drill the shield face for extra rivets to put the strap and handle on the back....but for a good viking shield, you'll need the wood.
For this you'll need about six to twelve popsicle sticks boiled until they're soft enough to bend. The easiest way to do this and get the proper curve is to boil just one stick at a time and bend it across the front of the shield and rubberband it in place. Once it's dry, it'll be a perfect curve to match the back side of the shield. It's slow as hell having to wait for each one to dry before going to the next though....so a large coffee can of about the same curvature as your shield is the next best thing. Boil your sticks and rubber band them in place around the can so they all dry with the same curve.
Once they're all dry completely, you need to start fitting them together so they form a wooden shield that fits perfectly into the backside of your steel shieldface.
Think in terms of a wooden barrel and all the wooden staves that go into its construction. Each of the staves will be curved....but also narrowed on both ends so when placed side to side they form a bowl and not just a curve. Like a Mercator projection map.
Once you get the wood all curved perfectly to fit the inside of your shieldface, use cyanoacrylate (superglue) to glue them all together and then trim the edge of the wood until you get it to fit perfectly inside the rim on the back of the steel.
To finish off the wood backing, lay the shield on it's back and rub it on some sandpaper to bevel the edge of the wood flat to the metal edge.
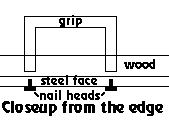
The last step is to add the grip and arm strap. You'll find it nearly impossible to rivet it in this scale like the real ones were, but this method recreates the look perfectly.
Drill two holes through the entire shield where you want your arm strap and grip to be....two holes for each. Then cut the heads off of four small nails or brads and superglue them into the holes on the front of the shieldface. On the back, you'll use two more nail heads to hold the arm strap....and use a piece of bent steel welding rod (shaped like a large staple) glued into the holes for the grip.
You can leave it rough finished for a "used" look, or polish it with different grits of sandpaper of course.....and for a viking shield you'll always want to paint it....though for medieval ones it isn't necessary.
A Great source of markings for your shield....if you know anyone who builds model airplanes....1/32 scale aircraft tail markings/decals make perfect shieldface designs. Dragon heads, animals, lightning bolts, and such. If you decide to use model decals, you can use some plain old white vinegar on the front of the decal to soften it so it fits down to the curvature of your shieldface....just be careful to not wash the adhesive off the decal back in the process. Temporary tattoos sold in just about every store you can think of these days make great markings as well.
As always, post pics to the group so we can see how yours turned out!