Brass Cups and Tankards
 RandKL's
Modeling Page
Brass Cups and Tankards
This is one of the easiest projects we could come up with to introduce you guys to etching. It'll probably take you about an hour to complete your first one including 30-45 minutes etching time, and you can produce about twenty of them for about $5 total. With practice and a bag full of shells, turning out twenty in a good evening isn't hard to do.
If you've read the buckles article and thought it was too difficult to do, try this one first and you'll see that etching can be *very* simple and yet produce fantastic results! We'll get into a few other things you can do with shell casings towards the end of this article so please feel free to skip around!
The items you'll need....
- a handful of spent brass shell casings. .303, .308, .30-06, 8mm Mauser, 7.62x54 Russian etc work best for tankards, but feel free to experiment! .44mag, .45acp, and .45LC make great cups, too!
- a set of needle (rat-tail) files
- a razor saw or a dremel with a cutoff wheel
- some very fine sandpaper....600 grit to finish/polish your project)
- a bottle of ferric chloride etchant solution
- some dry transfers from your local RadioShack
The first step will be to polish the brass shell casings with your sand paper. Do it now because it will be next to impossible later!
Now we do the cutting.
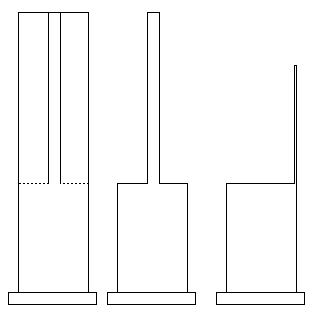
The first step in cutting is to cut two lines about 1/8 inch apart down the side of the casings to about one inch from the base. The next cut will be directly across the middle of the shell casing to remove the excess brass.
Your intent is to leave one spike of brass sticking up off the casings that you just cut down to about 1 inch high. DON'T bend the spike of brass yet!
File and sand all the edges straight and smooth to remove any burrs you left after cutting.

Next step is to wash the shell casings well in hot water and dish-washing detergent to remove ALL the oil. If you leave so much as a fingerprint on the brass, it'll leave a raised fingerprint on the finished project! Chemical de-greasers do work on normal brass, but shell casings are notoriously dirty so scrub them before you de-grease them! In any case, your first casing will tell you if you cleaned/de-greased well enough....if you didn't, do so the next time.
The next step is to get your dry transfers and begin applying them to the casings as per the instructions. Be creative....this first one is only for practice! Be sure to burnish the transfers down one last time to be sure.

Tip try to always put a strip of the dry transfer around the edge of the casing where the cup's lip will be....it'll add a nice raised lip on your finished project.
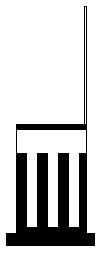
The next step is to mask the base and rim of the shell casing so it won't etch away. If you have some liquid latex mold making gunk handy, use a cotten swab and put a couple thin coats onto the base/rim; if not, use a black "etch resistant" magic marker to color the entire base and rim black. Those are at RadioShack too. Remember, that ANY brass not covered by a transfer or masking will etch away!
Now we etch them. Read the directions on your etchant before use! It can cause serious burns if mishandled!
Get a shallow glass cup or bowl (A coffee mug works perfectly.) with a flat bottom, and stand the masked shell casing right in the middle. You want it to stand level so turn/move it until it does.
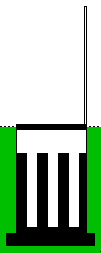
Now CAREFULLY pour the etchant solution into the cup or bowl until it's just below the rim of your brass casing....then use a glass eyedropper to add just enough to get it to the rim. You want the etchant to reach the dry transfer that you put around the lip of the casing.
The green shows the etchant level in the pic below.

Now let it stand and etch for about 30 mins or so....use your eyedropper to agitate the solution every couple of mins and be sure to check the casing every five mins or so. That single spike of brass you left sticking up makes a convenient handle to lift the tankard out of the etchant!
Couple of tips... if you use a coffee mug as your etching tank, the debris from the shell casing will build up in the bottom of the mug and slow the etching process around the lower parts of the casing. Your finished tankard will have a rough/unfinished look around the lower parts. That can be used to make some very nice "aged" tankards....but to avoid that on ones you don't want, be sure to agitate the solution often. Using a large, flat dinner plate instead of a coffee cup will do away with that problem but you'll still need to agitate the solution often to get an even etch.
The entire etching process shouldn't take longer than 30 mins. Be sure to check the tankard every few mins as it etches.
Once the brass has etched to your liking, run the tankard under the kitchen faucet for a few moments to remove all traces of the etchant solution. Now take your fine-grit sandpaper and polish off the dry transfers and masking you had put on. You're almost done now.
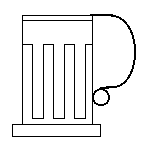
The last step is to bend that single spike of brass you left into an attractive handle. Use needle-nose pliers to bend it... that is the easiest way. It should look something like this...

Tip: Shorter shells (like .45 ACP or .45 long Colt) can be used if necessary. Just drill a tiny hole through the lip of the shell casing and solder or "rivet" a brass strip on with a brass craft pin from your local wallyworld or craft shop. Once it's done masking/etching, bend the handle just as before.
Now put it on a table with your Washington or Civil War Joes and post a pic to the group so we can all see how it turned out! Congrats on a job well done!
A slight variation of this project will give you a damned fine "tin cup" type of container for your Civil War figs. You'll need a couple of old, worn out AA batteries instead of the shell casings.
The first step is to strip the paper off of one of the AA batteries and then use a nail or other similar object to remove the top. Once you have the top removed, start digging the carbon electrolyte junk out of the battery.
Be CAREFUL to not get it onto anything....and wear rubber gloves during this to be safe. Some batteries will corrode just about anything they touch and some will eat through clothing.
Once you have the aluminum casing empty, rinse it *well* in warm tap water to remove any residue. The next step is to cut the slits down the side and across the middle just as you did before and then bend the handle.
That's all there is to that one....just remember to not get it too fancy-looking. A tin cup by definition is cheap and not very well made so leave yours rough-looking for the effect.
Civil War era pots and pans can be made from C and D-sized batteries just as well....they fit snugly into standard pill bottles if you need a cutting guide. Add a paperclip wire handle and you're done. Lots of batteries have separate metal caps that make great lids if you need them....add a craftbead knob if you want.
Another great cup material is brass tubing from your local craft or model shop. It comes in a dozen sizes so finding the right one is easy and soldering a sheet brass bottom on is just as easy. Acetate tubing works the same way if you want a "glass" look. For both types, sliding the stock to be cut inside another brass tube makes cutting straight lines easy!
Another example of easy etching for a terrific look is if you plan a chariot model. Sheet brass is cheap, can easily be marked and drawn on for your pattern, and etches quickly and easily. Imagine a Roman "door" shield with etched brass eagle design and trim? Your imagination is the only limit.


Richard  Kristi
 Kristi


 Kristi